 +86 1525 3141 880
CNC Routers have become affordable in the last couple of years and there are quite a lot of DIY CNC Routers out there.
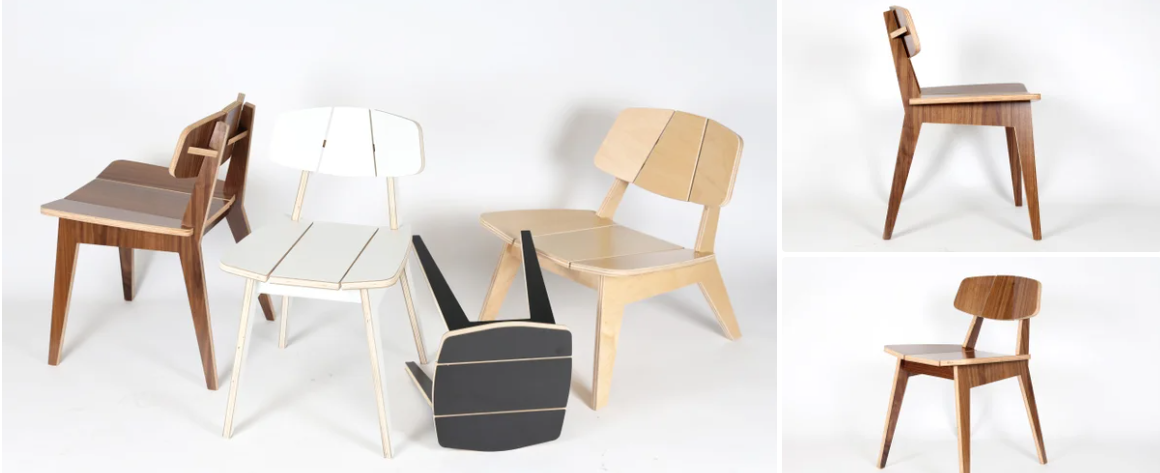
If you have a Shop by you can probably make it over there. around with the (worktable 4' x 2') and made a family of chairs: Lounge Chair, a Stool and this Dining Chair.
Materials:
¾ inch pre-finished maple plywood (2 sheets 4'x2')
Shopbot
¼ inch End Mill
Wood Clamps
Wood Glue
IMPORTANT: measure the thickness of your plywood! I purchased the white melamine plywood in 0.75” thick (19.05 mm) but as you can see from the photo,
the it was 19.81 mm and the pre-finished walnut was 18.95 mm thick.
This is really important to take note because the design has locking parts and we need to accommodate for a thicker material.

As you can see from the 2nd image, the stool fits in 1.5 sheets of 4' x 2' plywood (that was how big my working table on the ShopBot is)
and it is very fast to cut and assemble. You can download the Rhino file and STL to play around and edit the design.
Once I had all the flat pieces I arranged them in 4’ x 2’ sheets. Download the illustrator or Autocad file that you will need to create the toolpaths.
Note on woodgrain direction: This is an aesthetics warning. The orientation you give to every piece will matter once they are put together.
For example, it is nice to have the seat or the seat rest match in orientation because the wood grain will be continuous.
The seat is composed by 3 pieces and it will look inelegant if each one has the wood grain going in different directions.

Create a New File.
Now in Job Setup: We will create a file with the size of our material: 4' x 2' x 1/4" (or how thick your true material is). Zero on the top.
Import Vectors files and your vectors will appear on your sheet. Sometimes your vectors might be outside the sheet so will need to zoom out.
Another thing you need to do is actually joining open vectors, under the section Edit Vectors. Control+A will select all of the vectors and then hit the Join button.
Hit the Join button again.
If you need to correct or move some objects around the sheet now is the time to do it. You might want to do this to optimize material.
Under the Toolpath Operations you will see a few options. We will begin with Pocket Toolpath that will clear an area as deep as we want.
You should always start with pockets because all of your material will be in place - for example,
if you start with a Profile cut and your piece moved because you didn't have tabs
(or they were too thin) you will have a loose part and your pocket will be made in the wrong place.
Select your vectors that we want to pocket. These are all the small closed vectors that look like a dogbone and they are inside the cut pieces.
Click on “Toolpath” tab on right side of screen. Under “Toolpath Operations” select “Create Pocket toolpath.”
Start Depth: 0” (starting on top of material)
Cut depth: Choose a finished depth of cut which will be less than 3/4 ".
It used 0.551" but if you want to change it you will also need to change the dimensions of the part that fits inside.
Now you need to select the Toolbit you will be cutting with. Under Tool, click on Select and use a 1/4 inch End Mill
We are going to select Offset that will follows the contour of the design. Select Climb.
PROFILE TOOLPATH:
The 3rd icon is for Profile cut and a fill in sheet will appear with options. The first set of values will determine how deep you want to make the cut.
Our start depth will be zero since we zeroed on the top of the surface.
You want to cut all the material and a tiny bit of the sacrificial board so add a little depth to your Cut Depth (C).
Now you need to select the Toolbit you will be cutting with. Click on Select and use a 1/4 inch End Mill
Since we are cutting the pieces mark on Machine Vectors: Outside/Right.
Add Ramps to Toolpath, Smooth, pick a Distance (4-6 inches works well).
Save Toolpaths: You will be prompted a "WARNING - Tool will cut through material" but you know that already because you did that on purpose
when you selected the cutting depth. Once you succesfully created the toolpaths you will see a preview. Once you are satisfied with what you see, hit Close.
Make sure you select Pocket1 and Profile1 and hit Save Toolpaths, it will have an extension SBP.
NOTE ON CREATING TABS: Tabs are pieces of your material that won't be cut to hold the parts in place.
Since had quite a lot of parts to cut and I didn't want to do a lot of post-processing work I decided NOT TO MAKE TABS.
If you have a worktable with vacuum then this is great because you won't need tabs anyway.
Full sheets are 8' x 4' so you need to cut them down to 4' x 2' to make them fit on our Shopbot Buddy.
We didn't have a panel saw so I cut them with another person and a table saw.
Now you are ready to cut the pieces for your table. Place your 4’ x 2’ sheet of ¾ plywood on the worktable of the Shopbot.
Use screws to get the sheet down to the table.
Turn on the Shopbot and the Computer. Open the Shopbot manager.
Put the ¼ inch End Mill on the Collet and you are ready to Zero the machine in 3 axis.
Use the proxy switches to Zero both X and Y Axis. Now use the Z plate to zero the Z axis of the Machine.
Zero Z Axis with Z Plate:
Cuts - C2: Zero Z Axis w/Zero Plate
It will prompt if we have the Zero Plate bellow our bit. Hit Enter when ready.
It will now go down, touch the plate, go up and then slowly go down again to touch the plate one more time.
It will prompt that it has been zeroed. Awesome, now you are ready to begin the cuts!
Open your Toolpath file and hit Start. You will be prompted a Warning message to start your Router/Spindle.
Make sure you actually start the spindle before hitting OK on the Warning message.
The Shopbot will now begin to make the cuts on your material.
Now this is the easy and fun part. You sit down next to the router and watch how the machine cuts all of your pieces.
Since I was using a ¼ inch End Mill it will make 3 passes before it actually cuts loose each single part.
It will start by doing the pockets and then the profile cut.
Remember that we didn’t add tabs so if your pieces are really close to each other it might be a good thing to take your recently cut piece out of the table.
Once the job is done the Spindle will turn off automatically and you can unscrew your material off the worktable.
For a single lounge chair 2 sheets of 4’ x 2’ is needed so now go ahead and repeat the process for the 2nd sheet.
As mentioned earlier it is a really good idea to measure the thickness of the plywood.
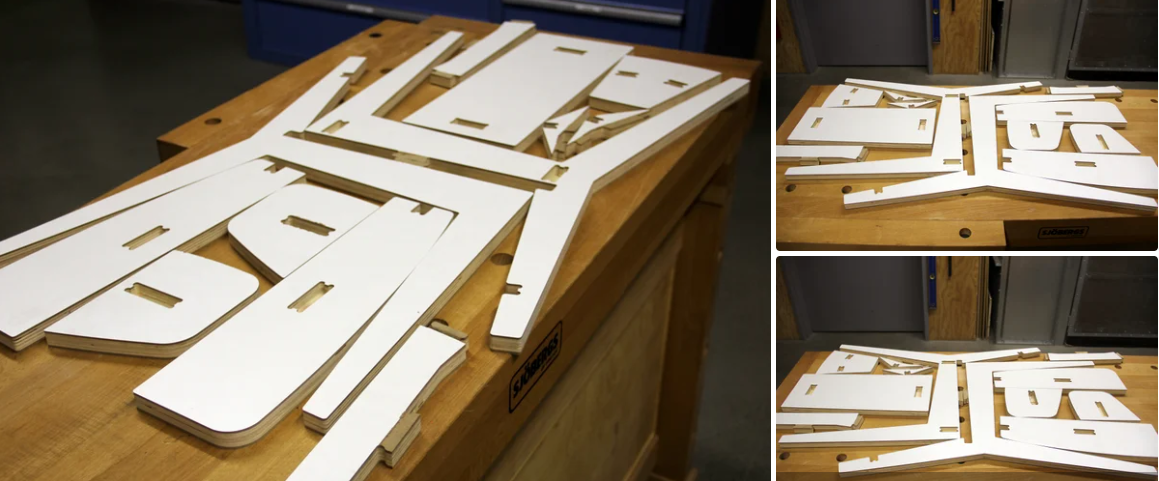
We have a bunch of pieces and it is a good idea to organize them before we begin to assemble. We should have:
2 legs
2 supports between each leg
3 seat parts
3 backrest parts
2 joinery parts
Now it is time to start assembling the pieces together. I started by gluing the the seat and moved on to other parts while it was drying.
Glue the 2 supports to the seat. Be real careful because the supports have different lengths.
The longest support should be glued to the pocket closest to the edge (look at the first image).
Clamp it nice and firm. Move on to the next step while you let it dry.
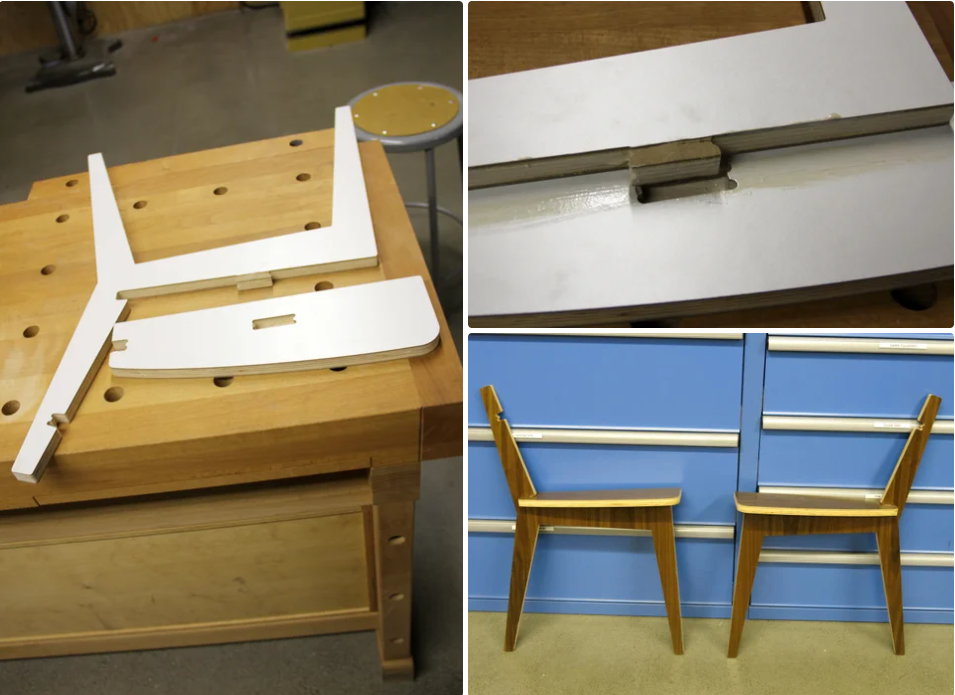
Nos assemble the left leg with the left seat. I used 2 clamps to hold it firm in place and then did the same with the right leg. Leave the clamps for 30-60 minutes.
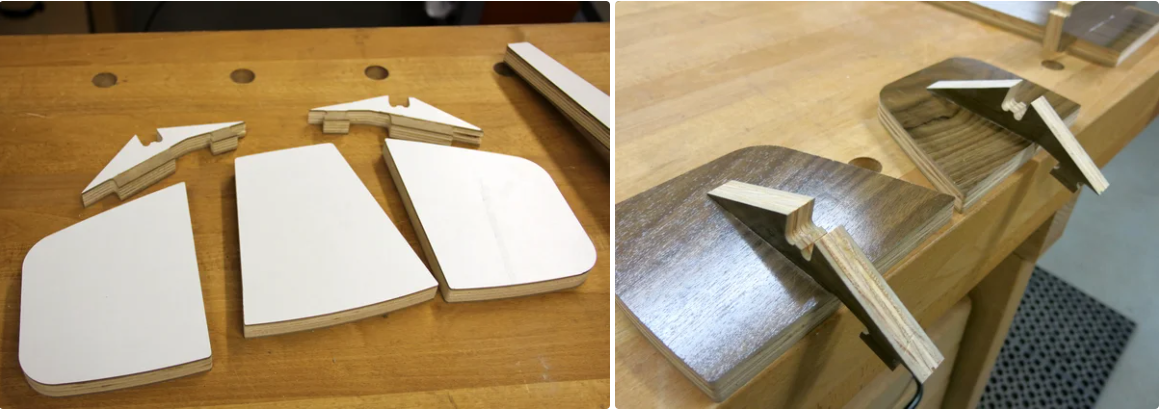
The backrest is composed by 3 parts. We will begin with the side sections and leave the middle part for later. Glue the side parts to the joinery section (the long tab).
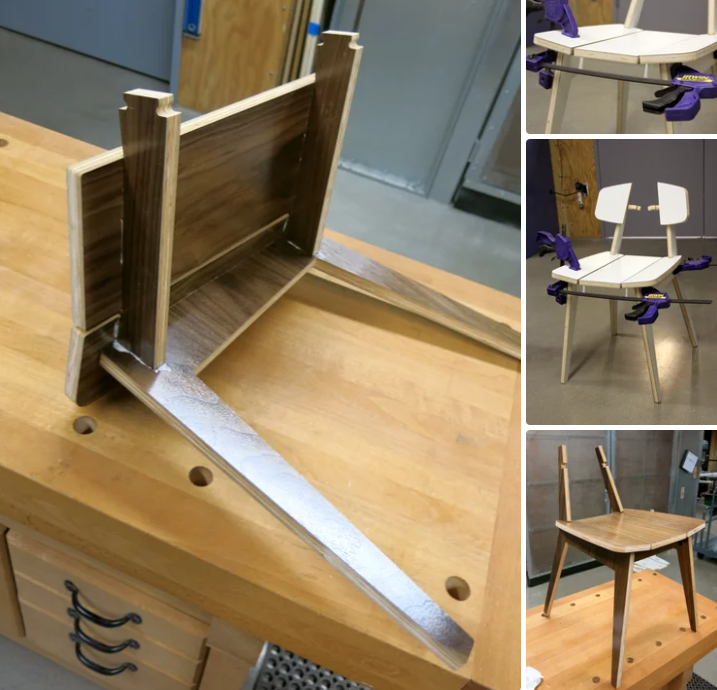
Once is the seat is dry you can take of the clamps and glue the seat to the legs. Use clamps again to make a firm joinery.
• Previous: CNC Marble Carving Samples by Stone CNC Machine
• Next: CNC Router Bar Stool
Jacob from United States
I am a beginner at CNC, I’ve never used a CNC machine before and with in a day I was carving. An awesome machine for a beginner to learn as hobbyists. I used the manual and the help video. One hour to assemble and test, very friendly and easy to use. It’s a good buy for the money. I would definitely recommend this machine to someone getting into CNCs.
Weinstein from France
I've been using CNC plasma SYP2060-300A and I am very impressed with this unit.
This unit is of higher quality, made in China. Five stars all the way!
2040 from INDIAN
Best 2040 CNC Router Good Price and Quality ! Thank SENYOQC
10w uv laser from American
Best supplier ! I bought 3 machines for laser and router , thank you Aillen ! --Alec
12KW Fiber Cutting - 2000X6000mm -- 이병헌 from Korea
Good machine for metal cut ! Thanks Senyo , Its prefect , I like your business patient kind!
I am a furniture manufacturer, and this machine is very good and fast. thanks Senyoqc Team ! from Bangladesh
Metal ArtWork from Denmark
The plasma cutting machine makes my artistic creation more convenient and precise!! Created more artistic ideas and value! Thank you Aillen team!
Thanks for 3D CNC Router, so much 3D works, just everyday use machine works.that is what makes the magic happen. from
Thanks for 3D CNC Router, so much 3D works, just everyday use machine works.that is what makes the magic happen.
I'm getting a little bit closer to completing more art deco jewelry use fiber laser marking machine.Thank you Senyo from
I'm getting a little bit closer to completing more art deco jewelry use fiber laser marking machine.Thank you Senyo
Thank you Senyo for SYJ1290-150W! from
Retired, ex mainframe systems programmer. Now full-time recreational woodworker majoring in puzzles, pens, boxes, Toys and occasional small furniture. Thank you Senyo for SYJ1290-150W!
