 +86 1525 3141 880
In this instructable we'll show you how to make this adjustable table lamp (that's also modular).
The lamp consists of 4 main parts:
The base
The arm (laser cut)
The lamp holder (also laser cut)
The lamp (LED & wires).
Each part of can be modified as you like, as long as you keep it compatible with the joints I made. I'll mention what that means as we go.
I hope you follow along and enjoy this project, and if you have any questions or comments Tools:
3D printer or access to one (not 100% mandatory)
Laser cutter or access to one.
Soldering iron & related accessories
Materials:
6mm wood (to be laser cut)
x4 (four) 35mm and x1 (one) 25mm M6 bolts
x5 (five) wing nuts (for M6 bolts)
Cement & sand (or a smooth concrete mix)
x6 (six) 3V LED's
18V DC power supply
5.5mm power jacks
Electrical wire
Plastic tube with a 6mm outer diameter
Anti-slip stickers
Glue (wood glue & gel super glue)
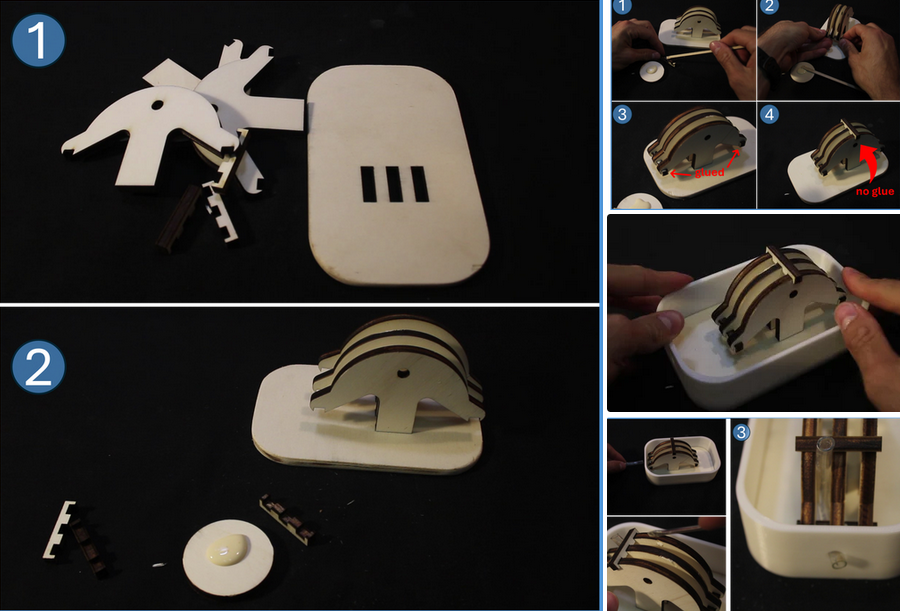
Press the odd-looking pieces (the ones that look kind of like umbrellas) into the bottom plate, as shown in the first image.
To make sure the parts are evenly spaced and remain so while the concrete sets, I used some spacers.
Use wood glue to attach two spacers to the odd-pieces like shown in the second image.
Then, add a third spacer to the top, this time without using glue.
Place the 3D printed shell onto the laser cut bottom plate (as shown in the third image).
To make a hole in the concrete base for the electric wire,
insert a short section of a 6mm plastic tube into the hole in the 3D printed shell,
and secure it away from the middle of the umbrella-looking parts using the spacer at the top (see the last image).
If you don't want to thread the electric wire through the base like I did, use some tape to cover the hole in the 3D printed shell.
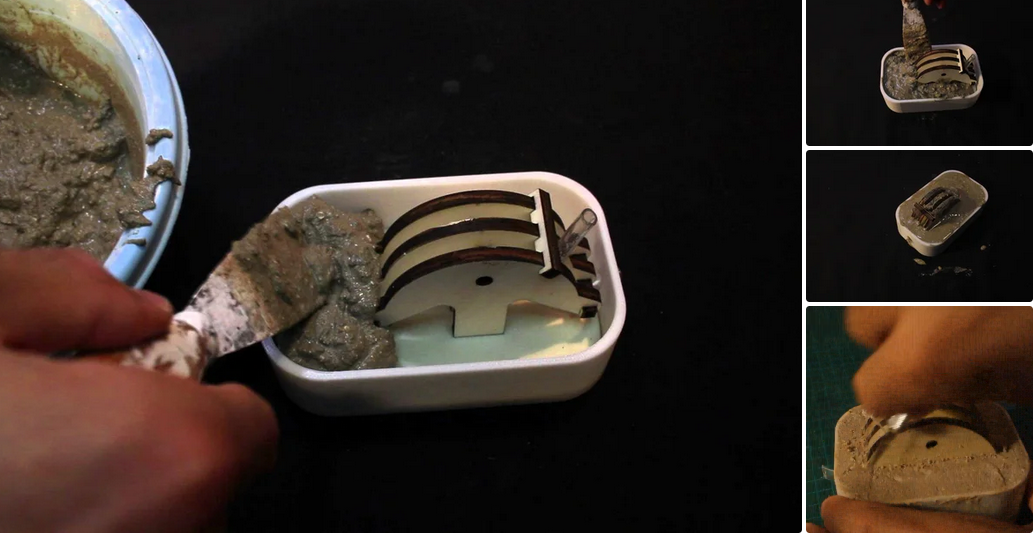
Mix cement, sand, and water to make smooth concrete.
Pour the concrete into the mold.
Make sure it's all filled, and that no air bubbles remain trapped inside.
After a few hours, use a knife to clean up the wooden parts (the joint) and sand the concrete to your liking
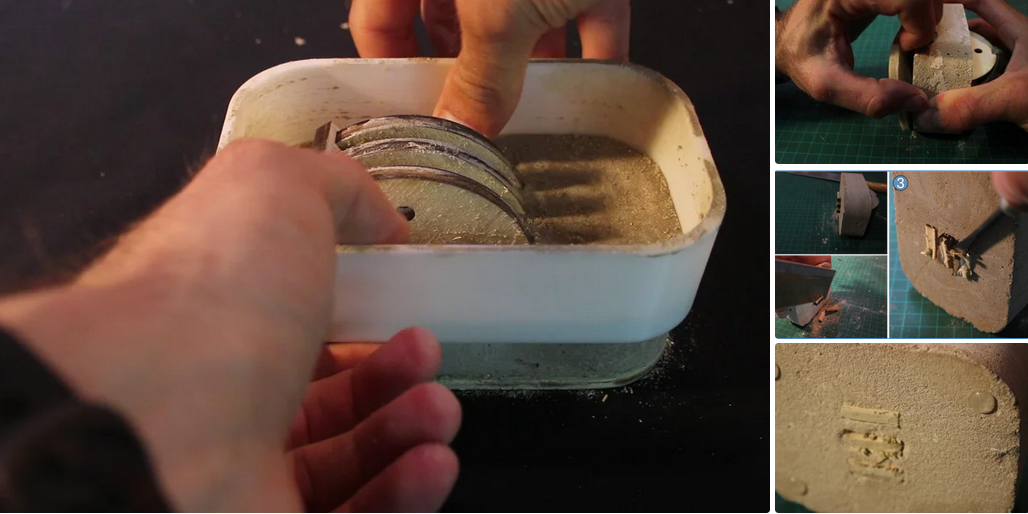
Let the concrete harden for a few days. Be patient, or else you'll have to repeat the previous steps many times like I did.
Demold by removing the 3D printed shell and the bottom plate (1st & 2nd images).
Use a saw to cut of the finger joints from the bottom. Don't worry it's not perfect, because it's going to be hidden anyway (3rd image).
Clean dust off the bottom side and glue anti-slip stickers to it (4th image)
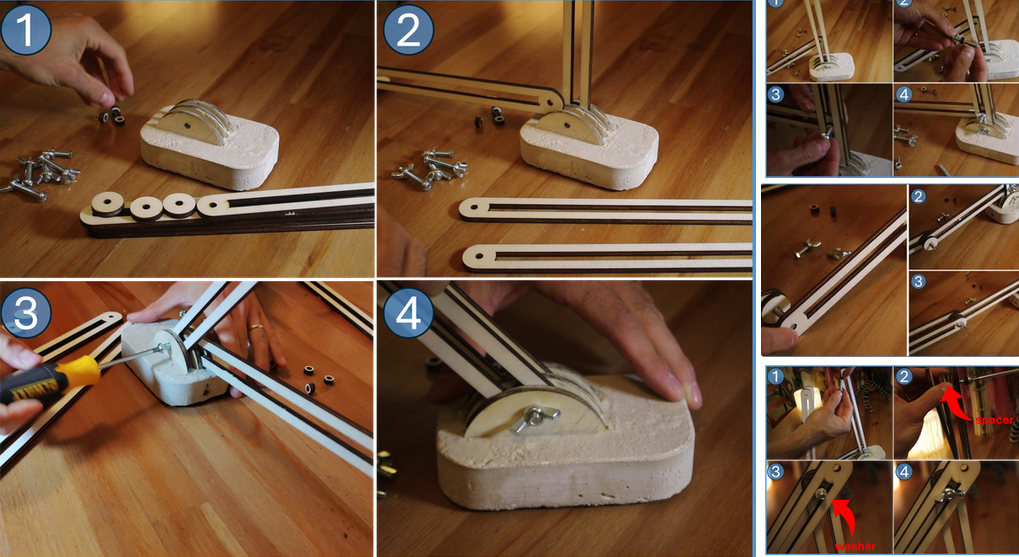
This step is not difficult, but hard to explain, so be sure to view the pictures along the text!
Cut the arms and the dedicated spacers and washers out of 6mm wood (file below).
You should have 4 long segments, 1 short segment, spacers and washers.
Use a 35mm M6 bolt and a wing nut to connect two of the long segments to the base (see 1st image).
Connect the short segment to the previous two segments:
thread a washer onto a 25mm M6 bolt and use it to connect the short segment to the two long ones,
as shown in the 2nd image. Insert another washer from the other side, and secure everything with a wing nut.
Connect the two remaining long segments to the shorter one.
Sandwich the short segment with the two long segments and two spacers like so: long-spacers-short-spacer-long,
and secure everything with a 35mm M6 bolt and a wing nut (3rd image).
Lastly, connect the previous 2 long segments to the ones attached to the base, with a spacer at the center,
and two washers at either end of the 35mm M6 bolt (see 4th image). Secure everything with a wing nut.
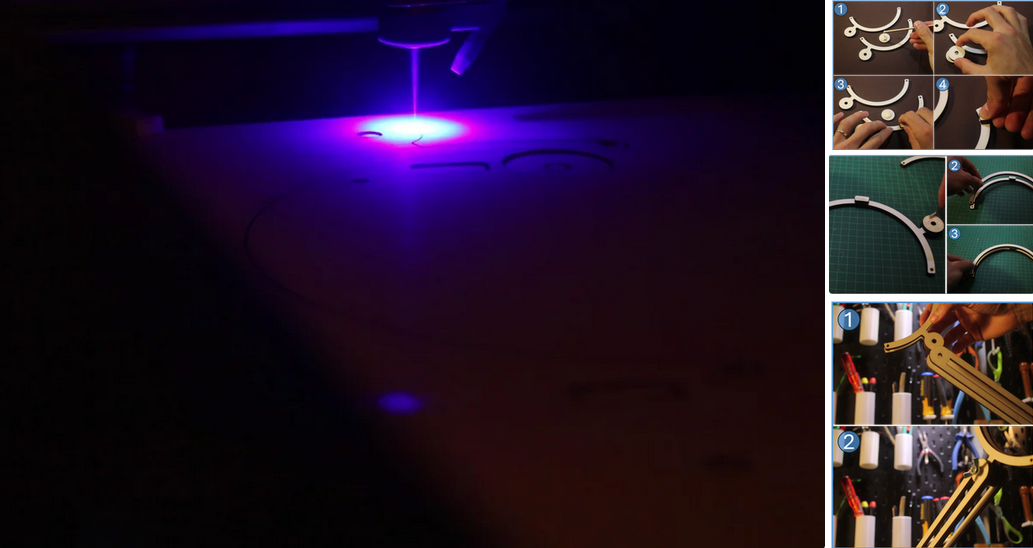
Laser cut the lamp holder out of 6mm wood (file attached).
Glue the circular spacer and the two rectangular ones to one of the outer parts of the lamp holder (2nd image).
Once the glue dries, spread some glue on top of the spacers and glue the second outer part to the spacers, as shown in the 3rd image.
To connect the lamp holder to the arm, use a 35mm M6 bolt and a wing nut (you can do it now or after adding the LED's).
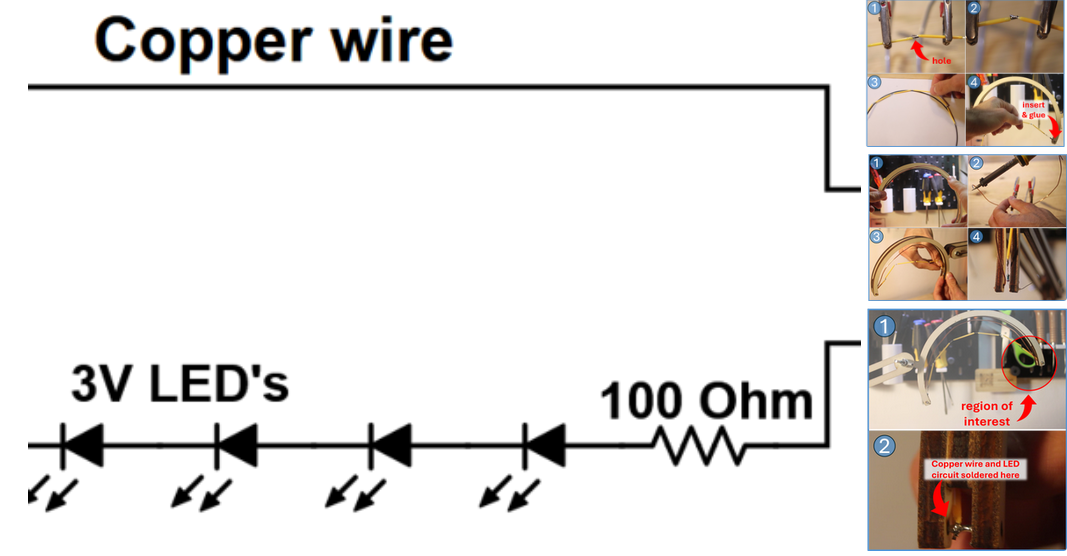
The schematic drawing for the circuit is shown in the first image. It's made of 6 LED's (3V each) connected in series,
along with a 100 Ohm resistor to limit the current going through them. The circuit is closed with a decorative copper wire instead of a simple wire. Let's get to it!
Solder 6 LED's + 100 Ohm resistor in series. Notice the LED's have a positive and a negative side, usually differentiated by a small hole in one of their arms (2nd image).
Bend the circuit to fit the lamp and use hot glue to secure it in place. It should fit into the small holes at either end of the lamp holder (2nd image).
To close the circuit you could run a simple wire from
the far side of the lamp holder, but I used an exposed copper wire.
first bend a copper wire to the shape of the lamp. Then, prime its ends with solder.
Finally, insert it into the lamp holder. It should fit into the small holes at either end of the lamp, but not at the same side as the LED's and the resistor (3rd image).
Solder the LED's to the copper wire at the far side of the lamp holder. I used a small bit of copper wire and soldered both of them to it (see 4th image).
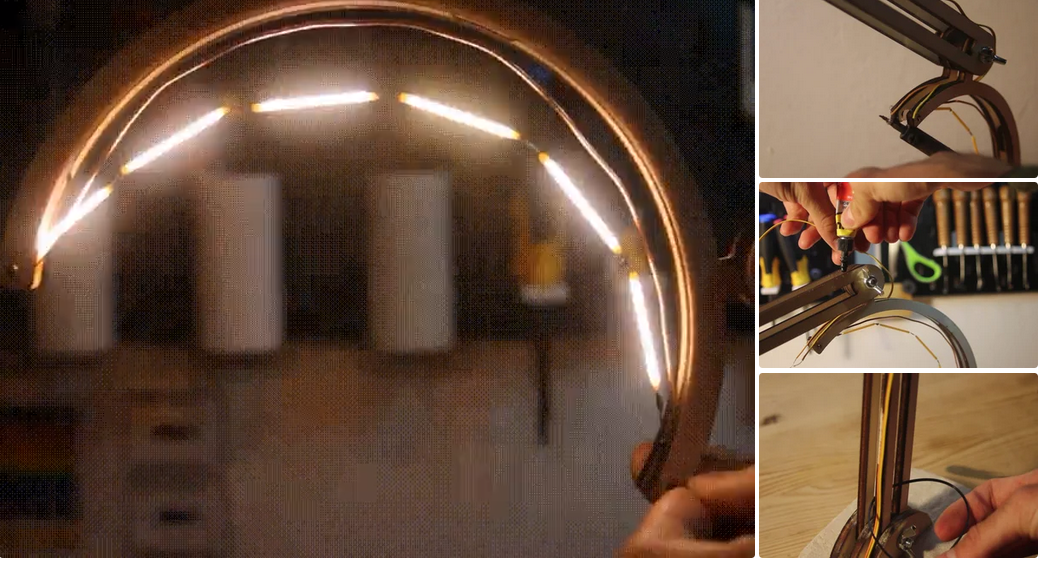
At this point, the circuit is almost done, and all we need to do is to run wires along the arm and to connect the circuit to a power supply.
Before we do, it's a good idea to make sure everything is working properly! In my case about 20% of the LED's were broken upon delivery!
Solder electrical wires to the LED circuit (one to each of its ends, as shown in the 2nd image).
Run it along the lamp holder and use gel super glue to hold it in place. Make sure you leave enough slack so the elbow joints can flex freely (see 3rd image).
Secure the wire with a zip tie and thread it through the concrete base (4th image).
Lastly, solder the power jacks to the electrical wires and connect the LED's to an 18V DC power supply.
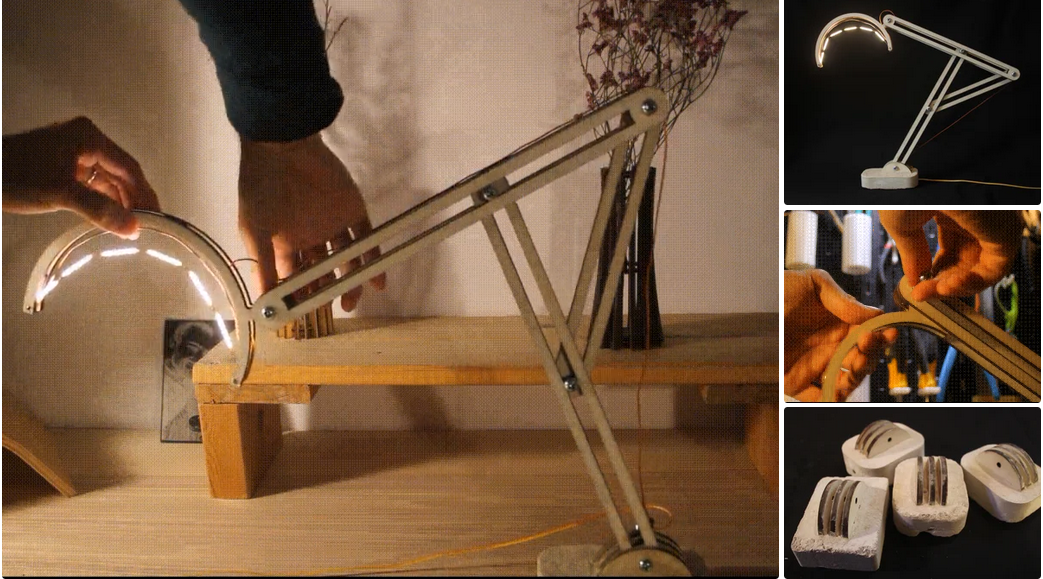
That's it! The lamp is ready for use.
If you look back at the project, you may notice that showed various versions of each part of the lamp along the way.
Specifically, made about 6-7 versions of the concrete base and two lamp holders.
Since the lamp is built to be modular, I was able to replace them with my favorite version (see the 2nd GIF and last image).
So, if you want to make changes to the design, you don't have to start from scratch - just modify the part you want to and keep the rest!
We hope this project inspires you to make something of your own!
• Previous: CO2 Laser cutting Baby Birth Block
• Next: None
Jacob from United States
I am a beginner at CNC, I’ve never used a CNC machine before and with in a day I was carving. An awesome machine for a beginner to learn as hobbyists. I used the manual and the help video. One hour to assemble and test, very friendly and easy to use. It’s a good buy for the money. I would definitely recommend this machine to someone getting into CNCs.
Weinstein from France
I've been using CNC plasma SYP2060-300A and I am very impressed with this unit.
This unit is of higher quality, made in China. Five stars all the way!
2040 from INDIAN
Best 2040 CNC Router Good Price and Quality ! Thank SENYOQC
10w uv laser from American
Best supplier ! I bought 3 machines for laser and router , thank you Aillen ! --Alec
12KW Fiber Cutting - 2000X6000mm -- 이병헌 from Korea
Good machine for metal cut ! Thanks Senyo , Its prefect , I like your business patient kind!
I am a furniture manufacturer, and this machine is very good and fast. thanks Senyoqc Team ! from Bangladesh
Metal ArtWork from Denmark
The plasma cutting machine makes my artistic creation more convenient and precise!! Created more artistic ideas and value! Thank you Aillen team!
Thanks for 3D CNC Router, so much 3D works, just everyday use machine works.that is what makes the magic happen. from
Thanks for 3D CNC Router, so much 3D works, just everyday use machine works.that is what makes the magic happen.
I'm getting a little bit closer to completing more art deco jewelry use fiber laser marking machine.Thank you Senyo from
I'm getting a little bit closer to completing more art deco jewelry use fiber laser marking machine.Thank you Senyo
Thank you Senyo for SYJ1290-150W! from
Retired, ex mainframe systems programmer. Now full-time recreational woodworker majoring in puzzles, pens, boxes, Toys and occasional small furniture. Thank you Senyo for SYJ1290-150W!
